Let’s celebrate

Dear crafty friends, good morning! Let’s celebrate a new day, life and enjoy living it in the present, the best we can!
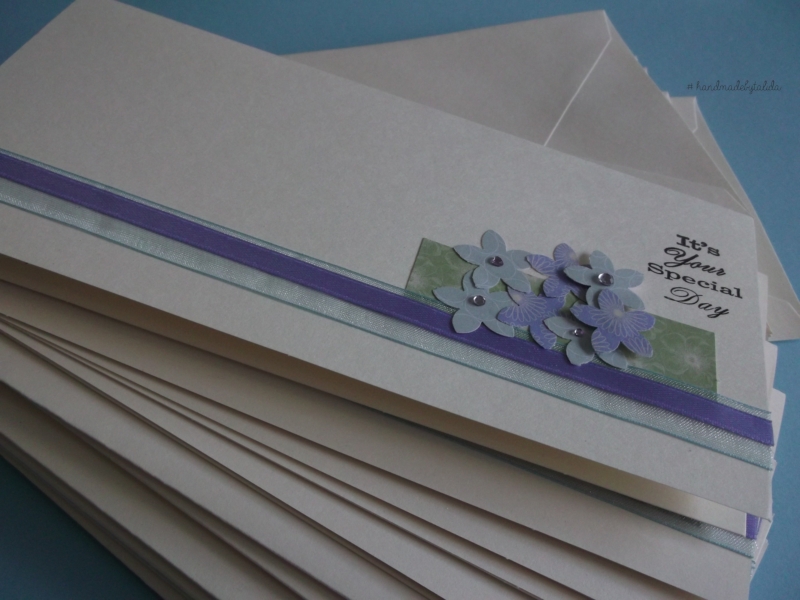
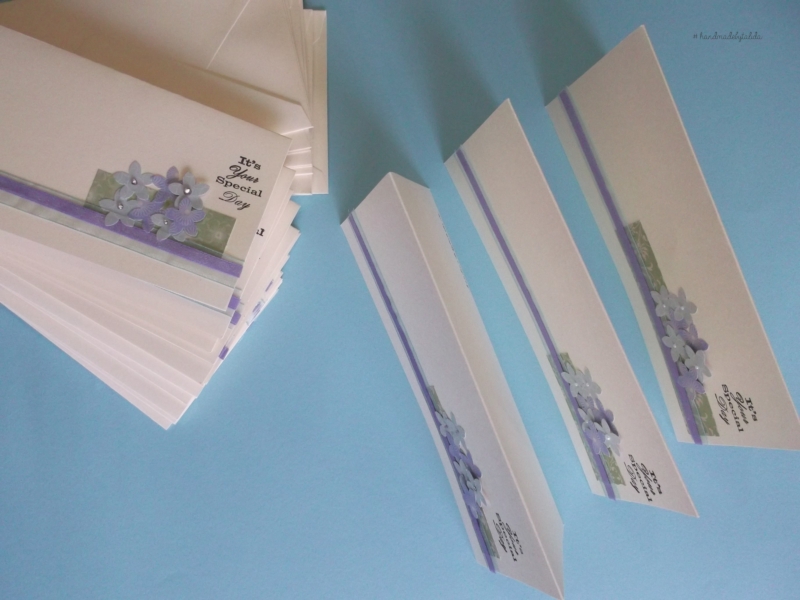
The card I’ll show you today is part of another 5 card set I made and gave to a beyond great person. What made me happy and all teary was the reaction of joy and eagerness to open the envelope box to see what’s inside. It literally filled my eyes with tears!

IMG8328

IMG8332

IMG8336

IMG8333

Back to the card, I used cream cardstock for the card base and rounded the bottom corners using my 1-2-3 Punch Board. Then, I die-cut some leaves out of kraft and green cardstock – 2 of each. In my stash, there are many other die cut pieces like the one I used for this card’s centre. This is a kraft card oval frame, die cut using WPlus9′ s Anastasia Tag dies. I stamped ‘celebrate’ as a sentiment onto it using Tsukineko’s Brilliance fast-drying pigment ink in Graphite Black. Next step was to adhere the leaves onto the front card base. In order to give more dimension, I pierced the centre frame on the sides, thread some red twine and tied it in a bow on the right.

IMG8345

IMG8337

IMG8339After that, I chose some sequins from Neat&Tangled Spring Mix set (bought from Seven Hills Crafts), 2 of each colour. It looked a bit incomplete, so, I thought adding some tiny dots with my Stabilo fineliner in red would do the trick. And that was all. My card was ready.

Wishing you a lovely day and sending you big hugs,
Talida

Petals and Leaves for a Special Day

Petals and leaves say good morning to you today!
The handmade card was created for a dear friend of mine to share on March special days. Yet, I am not sure if she’s kept it for herself or not. 🙂 It is one of the 5 card set prepared for her and there was a mini box to accompany it.

IMG8231

IMG8234

Read more

Soft felt flowers card

Good morning! The card I share with you today has some soft felt flowers on it. Also, it is part of a special set of cards I made for a dear friend of mine.

Hoping you’ve started the day with a positive vibe and having planned for a relaxing weekend, feel free to have a read at the short story of this handmade card.
So, I thought I give it a try and see if using a different material, other than paper on the card would give it dimension and a bit of a sophisticate look.

IMG8208

IMG8206

As I had die cut a lot of felt flowers and petals for the flower brooches project, it’s been easy to choose some soft violet felt flowers to use on the front cover of this card. You can see that I actually CASEd the card I made last year for Women’s Day.


IMG8210 IMG8214


Now, what’s different? The adhesive crochet border lace is Papermania Capsule Collection in Wild Rose not French Lavender; the felt flowers are adhered on a bigger pink soft flower as a base; the card is cream and patterned; the sentiment stayed the same as for the previous card, the flowers’ central disks are actually adhesive stones in pale lilac and not white adhesive pearls. Hope you like this approach too.

Wishing you a lovely day and a great weekend,
Talida

Some more freesia flowers

Hello, again, dear friends! Would you like some more freesia flowers love? I, for sure, would like more! As I love colouring a lot, I decided to stretch the stamp and die set a bit more and go try some different colours for the freesias. These are really beautiful and lovely perfumed spring flowers.

IMG8451

IMG8456

IMG8491

IMG8487 Read more

Flower Brooches and Mini Boxes

Hi, dear friends and crafters! This is going to be a short post about the flower brooches and mini boxes I made for the 1st of March. In a previous post, I mentioned that I made a lot of trinkets (M?r?i?oare) to give with this occasion.

IMG8268

IMG8269

IMG8271 IMG8270


As I love to overcome myself and find different ways to present my crafts, I chose to wrap the flower brooches in mini boxes. Here, the main and very useful tool is my 1-2-3 Punch Board from We R Memory Keepers. I’ve made a lot of boxes of various sizes and I can say that I am so happy I’ve got this amazing tool. 🙂 Also, this tool is excellent for making envelopes and ribbons.

IMG8274

The flower brooches are made of soft coloured felt, which I die cut using the Xcut Mini Flower die set and my Xcut machine. The boxes are made of 220 gr thick cream cardstock. The special twine made of red and white silk thread was bought from a local craft shop.
Hope you’ll enjoy seeing them and many thanks for stopping by.

Wishing you all the best,
Talida

Women’s Day Freesias

Hello, everyone! The post today is about celebrating Women’s Day. As a yearly habit I made some cards for Gabi, my beloved husband, to give on this great occasion.
So, I thought about the theme in advance as I wanted to have beautiful spring flowers. The best and most beautiful flower stamps and dies sets I recently acquired (well, here, there is a real debate with Gabi and sometimes with myself on how recent these are :-)) are Fresh Freesia from @Altenewllc. I bought them from Tara and Rick’s great online store. A store that I love and I cannot thank Keren enough for recommending it to me.
Now, back to the cards, I stamped 60 freesias onto thick white card and started colouring them. Once I got by the 2oth, I realised that my idea of having 3 freesias on a front cover would be too much and would take like forever trying to finish them on time. So, I had a bit over 20 freesias ready coloured with my Promarkers and went on die-cutting them using the coordinating die. Oh, my, how I loved seeing them die-cut! Awesomeness overload!

IMG8420 IMG8377 IMG8379 IMG8410


Then, I had an idea already in my mind on how to have them attached to the front cover of the card. But somehow…it looked not right. So…I chose to fold the front side of the card in 2 and then I adhered the freesia. It chose not to adhere it entirely, so I could create a bit of an overlay in order to create dimension. For the sentiment, I Asked Gabi what would he like to say and he chose ‘hope your day is amazing‘.

IMG8418 IMG8384 IMG8436 IMG8426Well, as the project took around 3 days, I took a lot of pictures. And when I say a lot, you can definitely think over 100. 🙂 IMG8388 IMG8445I know, a bit obsessed. But, I loved so much what I came up with! Gabi has been really kind to help me choose only 10 pictures. Thank you, love!

Oh, I was almost going to forget to mention that I made all the envelopes using my 1-2-3 Punch Board from We R Memory Keepers. This is an incredible tool! An I’ve made tons of envelopes and mini boxes so far!And I look forward to making more!

Hope you like my cards, many thanks for stopping by and look forward to being back here real soon,
Talida

Daisies

Hello, everyone! March is one of the busiest months of the year, with lots of celebrations, birthdays and lovely projects. One of my latest favourite brands is ClearlyBesotted. I found some digistamps over at Simply Cards & Papercraft and thought they are just the perfect ones for the occasions I had in mind.
Then I chose two of the stamps and edited them so that I had a bunch of daisies and a lovely sentiment. Once I had them arranged as I wanted, I went on and printed the image onto a thick white card.

Now, colouring has become one of my favourites too. I used Promarkers in the following colours: poppy, crimson, pastel pink, dusky rose, pink carnation, tan, pastel beige,pastel yellow and buttercup for the daisies’ petals; gold, buttercup and pastel yellow for the central disks; pastel beige, pastel green and leaf green for the stem and for the leaves. There was a lot of colouring in layers until I got to the desired nuances.

IMG8351 IMG8362 Read more

Mărțișoare #March Trinkets

Hello, everyone! Hope you are all happy, healthy and sound, enjoying the first days of spring. The post today is about M?r?i?oare, our famous March trinkets and about celebrating 2 years of having the website operational in this new format. It’s been a lovely journey and I am proud to see how much I’ve grown since!

IMG8516 IMG8518 IMG8523 IMG8531


#March is the month when we celebrate spring and when nature turns back to life and being green. There is an abundance of flowers and colours after all the winter months. And we all love to see that!

Happy #M?r?i?oare was my first post on the renewed look of my website 2 years ago. You can see how it looked like here. There have been many posts since and hopefully I’ll be able to keep up the rhythm in sharing with you my love for art & crafts. You can also have a look at last year’s brooches made with the same theme.

IMG8541 IMG8542 IMG8545 IMG8547


These trinkets were made of felt, die-cut with the XCut mini die flower set. They were created with the idea of being used as brooches with various occasions, not only in March, after removing the red&white twine specific for the celebration. I made a lot of them, but with this post I’ll share the first batch.

IMG8534 IMG8538 IMG8539 IMG8544


Hope you like them as much as I do and hope to be soon back on the blog sharing some more crafts made for the special days of March. The photos were taken by the amazing Cristian Istrate, who succeeds to capture the beauty of art with the camera in his hands. Thank you.

My best wishes and a lovely spring to you all,
Talida

Women and Mother’s Day

Hello, everyone! As Women and Mother’s Day are celebrated at the same time in my home country, I usually make a lot of cards to celebrate them both.

IMG7127 IMG7153


Actually, I kind of make lots of crafts and projects that I sometimes have so little time to share with you all. And by the time I get to them it is either too late, not matching the season and/or the project does not fit any longer with the level of crafting I am at. These cards were made last year, but somehow ended up in being published just now.
 

IMG7132

IMG7135 IMG7159

IMG7157


I started from one sample/model and adapted each set to make it just a slight different from the others.
The sets kept the same colour choice and pretty much the same fabric types, papers and embellishments. I have used blank cards and envelopes in cream, Docrafts adhesive pearls in white, Docrafts Papermania Capsule Collection adhesive crochet border in French lavender,for the flowers I used a puncher from Tonic Studios Punch & Stamp Set and Dovecraft Back to Basics IV Paperpack. All cards were stamped with an identical sentiment stamp marking the occasion: ‘It’s your special day’.

IMG7130 IMG7151 IMG7158 IMG7160

IMG7147 IMG7154 IMG7146 IMG7155

Many thanks for visiting and wishing you all the best,
Talida

DesignerCall

Guest Designer Call – March

Hi everyone! Hope your day went well and that you and your loved ones are doing well too!

I’m on the blog today with a project that I entered in the Guest Designer Call for March over on #GerdaSteinerDesigns page.

Screenshot_2016-01-23_07.40.23_medium

This project is a birthday card for one of my nieces, for Maria. She is such an adorable girl! Her birthday is on the 16th, but this year she celebrates it earlier. Happy birthday lovely girl!

For this card I used the #digistamps set called Dancing Penguins, created by talented Gerda. I am definitely in love with her designs! The card base is made of pink textured card. The front background is made of a piece of watercolour card, very lightly touched by a brush using some of the Distress Ink Minis (no. 4) after spraying it with some water. I fussy cut the penguins, the presents after colouring them with Promarkers.

IMG8120 IMG8131 IMG8135 IMG8143


I wanted to add some dimension, so, I added some Wink of Stella touches on the gift boxes, the hats and the scarves, then, a bit of Glossy Accents on the penguins’ beaks and feet. For even extra dimension, I adhered one of the penguins and one set of gift boxes using some double sided foam tape.

And of course, there is some baker’s twine wrapped around the upper side of the front cover, tied in a bow just to give it a bit of a final touch.

IMG8106 IMG8133 DesignerCall IMG8132


I will also enter this call with some of the past projects where I used #GerdaSteinerDesigns:

https://handmade.talidaionita.com/angels-lights/
https://handmade.talidaionita.com/dancing-penguin-shaker/
https://handmade.talidaionita.com/new-handmade-calendar/

Many thanks for stopping by and for your kind comments,
Talida

Put some music on…

Hello, friends and crafters! Wouldn’t you put some music on if you had some headphones nearby?! I know I would. Actually, I love listening to music as much as my brother enjoys creating and singing it. Which is… a lot!

The card I share with you today is the one I made for my brother’s birthday. Of course, it has a musical theme and a nice mixture of materials,textures using different nuances of blue, white, the transparency of  printed vellum, baker’s twine and natural colours of kraft and wood.

IMG8069

Read more

Country Landscapes

Good morning, dear friends and crafters!
These landscapes die-cuts are so lovely! I made them using the Memory Box die called ‘Country Landscape’. As a lately habit I enjoy die-cutting more than one item using the same die out of different coloured paper, card or textures. The ones I used here are die-cut out of white and dark blue cardstock, glitter card in blue. The best part of all is that I also used the negatives (the remaining paper/card after I die-cut) and combined it with different coloured landscapes. A great idea with an excellent effect! Read more