With Love at Christmas

With love at Christmas starts the wish for you today! May you have a wonderful time together with your dear ones! While having a blast on Christmas days with my family, I’d like to share some more of my holidays’ crafts. I made more than 200 cards and it will be a true challenge to share them all with you.

imgn0536

imgn0530
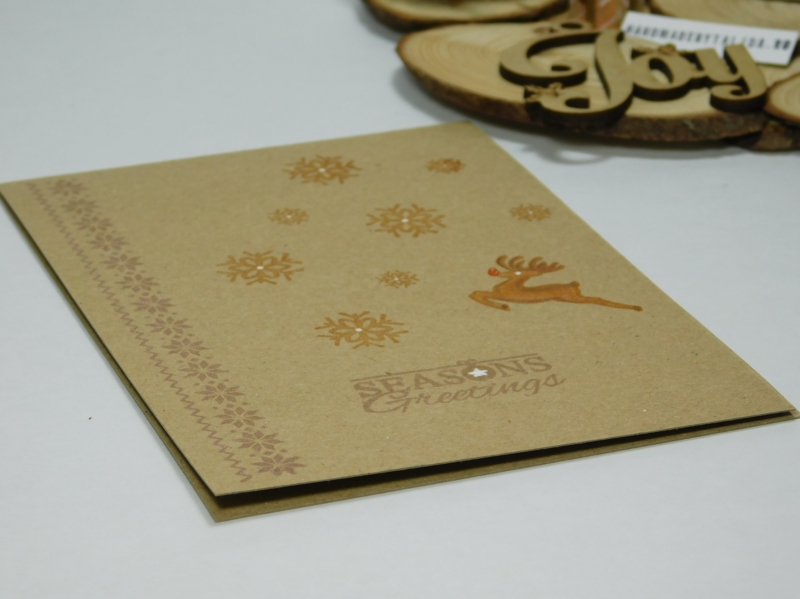
The one here is a very simple but elegant one. I used a ‘Create Christmas‘ stamp to build the background. The ink I used is ‘Chocolate’ – Artiste dye ink. Sequins in white, gold and chocolate give the necessary sparkle together with some gold thread wrapped around the front card base. A white string bow is what gives some dimension and brings the focus to the top of the card. All these bits and pieces can be found at any haberdashery. I got mine from my neighbours’ store.

imgn0531

imgn0547I’ve always wished to go for a look just like this one. And I was a bit not sure of the result in the past. But once I tried it, would definitely make me apply the pattern again.
Hope you like it too!

With all these said, I let you enjoy the second day of Christmas together with your dear ones!
Talida

Stockings

Were stockings ready for Santa?

Merry Christmas, everyone! If the stockings you hung weren’t filled with presents last night, hope they have been topped up this morning. You know – Santa’s been pretty busy!
I am one of the lucky ones, so Santa stopped by and left me some goodies. What can I say? I am beyond grateful!

imgn0560

imgn0564

These cards showcase a die-cut from Stix 2 Anything and I bought a pack of these a while ago from Craftmall. I still love to use them on Christmas crafts. First thing I did was to decorate the stockings. I used my white gelly roll Uniball pen for this and when ready, I went on to create the backgrounds.

imgn0548

imgn0555One of the cards has got a panel created with a Heidi Swapp chevron stencil using some distress inks in green. The front card has a first layer with a cream recycled card which has a sentiment stamped at the top. I adhered the stencilled panel, then the stocking and finally I added a red ribbon bow on it.

imgn0558

imgn0551The second card has a background created with a sentiment stamp from one of the Create Christmas sets. I stamped it using an Artiste dye ink (Red) all over the front card base. A velum panel holds the stocking, some white sequins create interest and a cream string bow gives the necessary extra dimension.

Many thanks for stopping by my blog and Happy Christmas wishes to you all with the hope you enjoy these holidays together with family and dear ones!
Talida

Christmas Wishes

Hello, dear friends and crafters! I’m sending my best Christmas wishes to you all today!

imgn0089It’s the 24th of December and we’re all getting ready for the celebrations. While my favourite biscuits are baking in the oven, I’m trying to catch up with the posts on my blog.
This year I made a lot of seasons’ cards and I would love to share them with you.

imgn0086This card features another mini Xcut die from Docrafts – the stocking one. They came with a lot of new products this year and I love the mini dies, especially the filigree ones. I chose to combine two of the sentiments sets ‘Happy Christmas’ and ‘Best Wishes’ and use only two of the words.
The card front is embossed. I used the ‘tartan’ embossing folder and it (the card) has just a few elements on it in order to keep the CAS (clean and simple) look.

Christmas Whishes

Christmas Wishes

When I adhered the stocking, I chose to use the bits and pieces from 2 different die-cuts (red and white). My wink of stella clear brush came in hand and gave a bit of shimmer to the sentiment. Both, the stocking and the sentiment have some white gel pen dots for a nice finish.
Thanks a lot for stopping by.

Happy Christmas Wishes to you all,
Talida

Bells are ringing

Hello again, dear friends and crafters! Can you hear the bells are ringing? They are just letting us know that soon we’re all gathering in our homes and by our Christmas trees.

imgn0079

imgn0071The cards today feature a mini Xcut die with some filigree bells.
I used kraft recycled card in different colours and also some metallic/shimmery and glittery ones. The twine ties the bells and it is either simple in white, red, purple or in assorted Christmas colours. The inks match the colour combination of the die-cuts and the twine. And for these cards I chose two sentiment stamps from Docrafts Create Christmas series sets: Merry Christmas and Seasons’ Greetings.

imgn0084

imgn0064These cards match the challenge of making at least 5 cards with the same stamp or die. They also go in the CAS (clean and simple) category of cards. The die-cuts are pretty intricate but I love them.

imgn0070Many thanks for stopping by and wishing you all the best,
Talida

Snowflakes, Snowflakes

Hello,there! Just a few days left until Christmas and I would love seeing some snowflakes falling! It would be great!

imgn0167

imgn0168Now, till we have some real ones, please, let me show you some stamped ones.
For this card, I used the snowflakes from Docrafts’ Create Christmas stamp set. It is one that I received as a gift with my Creativity Magazine last year (I think).
I stamped them using Dew Drop fast drying pigment ink in Moonlight White.
The details on the snowflakes are metallic accents using some Sakura gelly roll pens, Papermania watercolour pencil in red and/or my Uniball- Angelic Colour in white.
I chose the sentiment from the Krafty Christmas stamp set from Trimcraft. I’ve recently used the reindeer stamp from the same set.

imgn0170

imgn0174Each of the cards has either twine or ribbon tied on the front cover in order to add dimension and interest. I used Fancy Twine and some twine and ribbon (bought from a local haberdashery store owned by my neighbour).
I love that they are CAS (clean and simple) – not too much, not too many.

Hope you like them too and thank you for visiting my blog.
Talida

The Trees and the Season

Hello crafters and dear friends! As much as kids love decorating trees, I love creating them on paper or card. These cards use some new die-cuts from Docrafts which come in a smaller size than their usual ones. They are intricate and I really like the way they look on my crafts.
As per lately, I used kraft recycled card for the card base, green recycled card for the tree and some cream cardstock from the scrap stash for one of the sentiments.

imgn0095

imgn0099The first card has the front cover embossed with Docrafts”Tartan‘ embossing folder. I bought it a while ago from here. It has the mini die-cut tree adhered onto the card with glossy accents. It also hangs from the top fold and it’s got a bow. For this I used some green twine. There some metallic embelishments made with a gelly roll pen from Sakura.
The sentiment is die-cut using one of the latest Xcut dies from Docrafts.

imgn0061

imgn0065The second card is a CAS (clean and simple) too. It has the die-cut tree, a piece of Fancy Twine tied into a bow and a sentiment stamped in Artiste red dye ink.
Both trees have a star on top: one is tiny and golden and the other is a bit bigger and silver.

Hope you enjoyed your visit on the blog and look forward to having you back,
Talida

Christmas Presents on Blue Kraft

Good morning, everyone! What about some early Christmas presents? Wouldn’t this be awesome?

imgn1108Today, I have a card with lots of them. They are stamped with a fast drying ink in Galaxy Gold onto blue recycled card. I enjoy crafting with recycled Kraft card a lot these days. It is of good quality and it gives you room for trying a lot of techniques. Read more

Reindeer Greetings

Hey, there! Reindeer greetings to you all! Santa is gathering all the last minute letters and I am sharing with you my latest cards. For these, I used the same stamps and created 5 different ones. Actually, that was my challenge for this Christmas: make more cards using the same stamp set. And well, I succeeded to make even more! Then, I mixed the sets, as in this case, and pushed creativity further. 😉

imgn0207

imgn0213

I made the top-folded card bases from recycled card. This type of card became my favourite. I stamped with Docrafts Artiste dye ink (Chocolate, Red, Metallic Jean Blue) and fast drying pigment ink from Tsukineko (Gold Galaxy). The stamp sets I used are Docrafts Create Christmas (came with a Creativity magazine), Tall Urban Stamp – Craft Christmas and Krafty Christmas by Dovecraft.

imgn0224

imgn0221

The snowflakes have dots added with a white gel pen. I think this gives a lot of interest. And I put some glossy accents from Ranger on the reindeer’s noses. This gives dimension and a lovely shine.
The reindeer are coloured with Docrafts Papermania watercolour pencils.

imgn0190

imgn0192

imgn0193

imgn0198

Thank you for reading this blog post and look forward to having you back here, soon,
Talida

Gorjuss Birthday Song

Good afternoon, everyone! A Gorjuss birthday song is streaming online today. This one is for a special girl who turns 8. She makes us smile and fills our hearts with joy. Happy birthday, dear! May you have a blessed life!
Tradition is to make her a birthday card using one Gorjuss stamp. I have some new ones and I used the ‘Little Song’ set for this. Santoro released some beautiful designs this year.

imgn1147

imgn1142

Now, back to the card, I have used a lot of recycled card lately. It feels natural and I like the way my crafts look like using it. So, the base card is top folded. I stamped the Gorjuss girl using my new precision stamping tool (a great one). Then, I added the heart and some musical notes. Having this tool makes the life of any craftmaker super fun and easy.

I coloured the images using inktense pencils.

imgn1146

imgn1140

And then, I added dimension using some glossy accents on the heart, headphones and phone, plus some clear Wink of Stella on the headband and shoes. To give a finished look, I trimmed a thin piece of card and glued it on the bottom part of the front base. I coloured it using the same inktense coloured pencil as the one for the heart.

Thanks for stopping by and wishing you all a lovely afternoon,
Talida

Peace and Joy

imgn0262Hello, everyone! ‘Peace and Joy’ is one of the many cards that are to be shown on my page during the following days until Christmas.
It is a clean and simple card (CAS). And I really like the way it turned out.

The card base is made of 280 g kraft recycled card. I have discovered there’s a Romanian craft shop where you can find it at a very good price and high quality. And I highly recommend it.
Onto the card base I stamped – using Docrafts Artiste dye ink pad in ‘Chocolate’ – one of the stamps from last year’s Docrafts stamp sets ‘Folk Christmas’. Once it was dry, I added colour using some Papermania watercolour pencils. When finished colouring, I wrote the sentiment ‘peace and joy’ using an Artiste gel pen in white. With the same pen, I added a few dots on the robin’s tail’s feathers to create interest.
In order to increase the focus on the area where the stamped image is, I tied some white twine in a bow, glued it with some glossy accents and I trimmed a thin piece of burgundy card and glued it as to look like a frame.

Hope you enjoyed reading this new post and look forward to having you back on my page.

All the best,
Talida

Stencilled Background Thanks Card

Hi, everyone!Hope all is well with you all and many thanks for visiting my page.
I Know Christmas is close, just a few weeks left, but before sharing my cards made for the occasion, I’d like to share some projects from a while ago. Had no time to share them before and I am certain if I don’t do this now, I won’t do it later for sure.

img9171So, today, I’ve got a thank you card with a stencilled background. It is a pretty simple card and I really love how it turned out.
First, I die-cut the word ‘thanks‘ using a Paper Smooches die out of a piece of white card.
Then, I added the colours to the die-cut using some sponge daubers and distress inks. I used a mix of candied apple, abandoned coral, carved pumpkin and fossilized amber.
The following step was to create the background. I used a Tim Holtz stencil called Doily, a piece of cream card and distress inks (the same as those used for the ‘thanks’ die-cut word and a few more: evergreen bough and scattered straw).
As you can see, the background is not completely filled in. I left the bottom part clear so I could add the die-cut word.
To add dimension and interest, I added some clear Wink of Stella onto ‘thanks’ and some twine in red and gold which I tied in a bow at the top right corner of the card.
img9169
The card was part of a set created for a dear friend and it has a matching envelope (you can find it here).

Many thanks for stopping by and wishing you all the best,
Talida

Thanks – Autumn Colours

Hello, everyone! Thanks for joining me today for an autumn coloured thank you card.
I made this for a dear friend, who asked me to create her some cards, and this is one of the three I made.
I’ve got ‘a few’ new distress inks to play with and I thought it was a great idea to create this autumn coloured themed card with. These are candied apple, carved pumpkin, scattered straw and fossilized amber.
As this was an autumn card, I used some leaves stamps from Santoro’s Gorjuss stamp set ‘The Fox’. For those who know me, they can tell I do love all things Gorjuss. So, I gave the small stamps a bit of love and autumn colours. As I wanted to created lovely real colours I mixed the ink directly onto the stamps and then pressed onto a top folded cream card base front. I planned to join the monthly challenge on the Seven Hills Crafts blog page as I used their September challenge template suggestion. Had no time to join then, so here it is, two months later.

img9156

img9152

img9151

img9149

The ‘thanks’ script is from Paper Smooches and I die cut it out of cream card and then applied the same distress inks used for leaves. I adhered it using glossy accents under the first row of autumn leaves.

img9191
Under the second row of leaves I wrapped around some red twine and just a bit of yellow one tied in a bow to add dimension. For more interest and sparkle, I added some sequins in matching colours.

Thanks for stopping by. Looking forward to be back soon,
Talida

Bun?, tuturor! M? bucur c?-mi sunte?i al?turi ast?zi pentru o felicitare de mul?umesc în culori de toamn?.
Am creat aceast? felicitare pentru o prieten? drag? mie, care m-a rugat s?-i creez ni?te felicit?ri de mul?umire ?i aceasta este prima dintre cele trei.
Cu ?câteva? noi tu?iere distress inks achizi?ionate, m-am gândit c? ar fi o idee excelent? s? creez o felicitare tematic? în culorile toamnei. Acestea se numesc m?r caramelizat (candied apple), dovleac sculptat (carved pumpkin), paie împr??tiate (scattered straw) ?i chihlimbar fosilizat (fossilized amber).
Fiind o felicitare de toamn?, am folosit ni?te ?tampile cu frunze din setul ?Vulpea? creat de Santoro’s Gorjuss. Cei care m? cunosc, pot spune c? îmi plac foarte mult toate produsele Gorjuss. Astfel am d?ruit pu?in? aten?ie ?i culori de toamn? ?tampilelor mici. Pentru a crea frumoase ?i reale culori de toamn?, am amestecat tu?ul direct pe ?tampile ?i apoi le-am presat pe coperta bazei de culoare crem a unei felicit?ri îndoite în partea de sus. Mi-am propus ini?ial s? particip cu aceast? felicitare la una din provoc?rile de pe blogul Seven Hills Crafts pentru c? am plecat cu ideea de la schi?a lor pentru luna septembrie. N-am reu?it s? particip atunci, a?a c?, iat-o aici, un pic mai târziu.

img9156 img9152 img9151 img9149

Cuvântul ?thanks? (mul?umesc) este de la Paper Smooches. L-am decupat din carton crem pe care am aplicat acelea?i tu?uri ca cele folosite pentru frunze. L-am lipit sub primul rând de frunze cu ajutorul unui lipici transparent ?i foarte puternic.

img9191

Sub cel de-al doilea rând de frunze, am ad?ugat ni?te ?nur de culoare ro?ie si unul mai scurt galben, din care am f?cut ?i o fundi?? pentru a crea dimensiune. De  asememea, pentru un interes crescut ?i pu?in? str?lucire, am ad?ugat ni?te paiete în culori asortate temei.

Mul?umesc pentru vizit?. Sper s? revin cu un nou articol în curând,
Talida